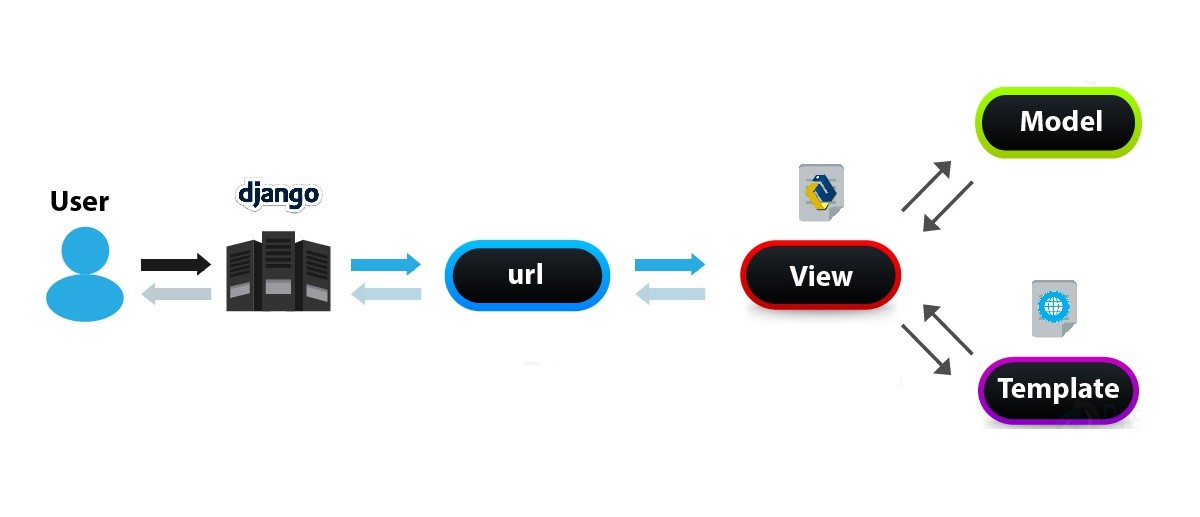
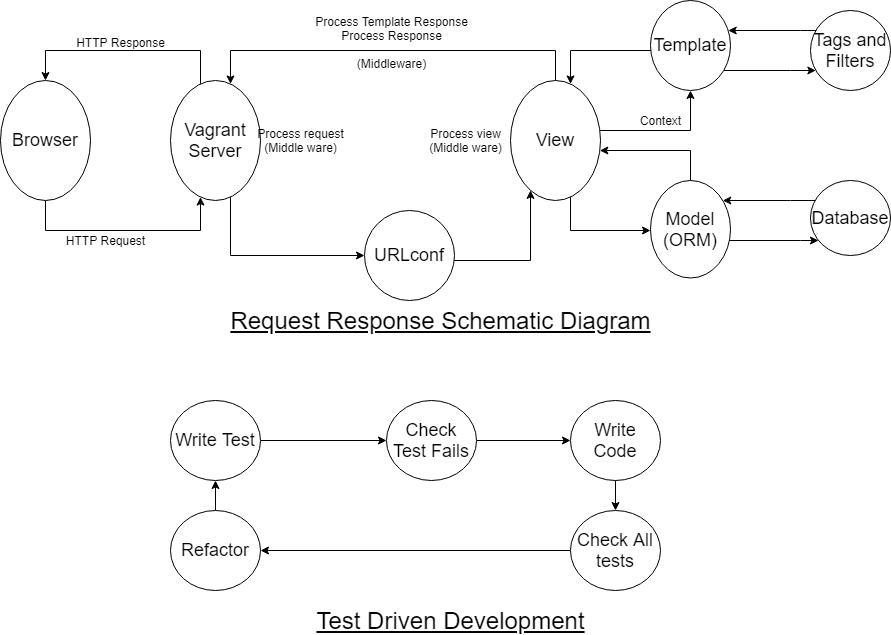
Django Backend Architecture
Learn to create your own portfolio platform like portfoliobox.net - Open-Source Project By Aditya Raj
About this open source project
The open-source project is for the developers who are trying to learn and create an application by following the best practices and paradigms. The project requires familiarity with Python programming language.
This project is based on creating a portfolio website backend in which a user could create his own customizable portfolio and then generate a public link that could be accessed by everyone. However, the updates made in the portfolio could only be possible by the logged-in user corresponding to his own details.
The project’s main aim is to serve a complete set of API that could be used and updated by anyone for creating a similar kind of web application that features creating a custom user model, generating very own models for serving data, to create respective serializers, customizable API’s with selected HTTP methods.
Learn to build a portfolio website backend
Features that are taken into consideration while building.
- Backend written using Django Framework - Django provides simplicity, flexibility, reliability, and scalability. Django has its own naming system for all functions and components
- Easy to Customize - Pluggable and easy to customize emitters, parsers, validators, and authenticators.
- Response Handling - HTTP response handling, content type negotiation using HTTP Accept headers.
- Views for request/response - Clean, simple, views for Resources, using Django’s class-based views.
- Converting data into valid HTTP request - Powerful serialization engine using Django’s rest framework.
- Unit tests for modules - The tests have been written to test the view sets and models with database mocking.
- Vagrant file configured - Ready to use a Vagrant file for getting started with any kind of Django projects.
- Feature encapsulation - Django follows a file naming convention to manage the apps and so different feature are group together.
- Sitemaps - Added sitemap that facilitates crawlers indexing the site, therefore sitemap plays a crucial role in modern SEO.
MVC Architecture: Model, View, Controller

Test-Driven Development

Project outline

Concepts used in the project
- Difference between Vagrant and Docker
- Creating a sitemap
- All about DRF’s viewset
- Authentication vs Authorization
- Extending Django’s user model
- Writing tests in Django
You can find the complete API documentation here
Required setup
For development server -
- vagrant - tells what type of server we need
- virtualbox
For application code -
- layer 1: python
- layer 2: Django - provides feature for creating a standard web app
- layer 3: Django rest framework
Utility tools -
- atom editor
- git: version control
- modheader: to modify http headers while testing API
How to Build and run the project
- Install using vagrant [Recommended Method]
- Clone this repo.
- Install Vagrant Find instruction here
- Execute
vagrant upto start vagrant box - Execute
vagrant sshto connect to Vagrant Box - Install postgresql in vagrant
- Create user and database for postgresql
git bash vagrant@ubuntu-xenial:/vagrant$ cd /vagrant/ vagrant@ubuntu-xenial:/vagrant$ sudo su - postgres postgres@ubuntu-xenial:~$ psql postgres=# CREATE USER myprojectuser WITH PASSWORD 'password'; postgres=# CREATE DATABASE myproject; postgres=# GRANT ALL PRIVILEGES ON DATABASE myproject to myprojectuser; postgres=# ALTER ROLE myprojectuser SET timezone TO 'UTC'; postgres=# ALTER USER myprojectuser CREATEDB; postgres-# \q postgres@ubuntu-xenial:~$ exit - Quit postgres and run the following commands from the same bash
vagrant@ubuntu-xenial:/vagrant$ cd /vagrant/src/django_backend_api/ vagrant@ubuntu-xenial:/vagrant/src/django_backend_api$ python3 manage.py makemigrations vagrant@ubuntu-xenial:/vagrant/src/django_backend_api$ python3 manage.py migrate vagrant@ubuntu-xenial:/vagrant/src/django_backend_api$ python3 manage.py runserver 0.0.0.0:8080 - The server could now be accessible from your browser at 127.0.0.1:8080
- Direct install
- Create a virtual environment.
- Clone the repo.
- Install postgresql in your system
- Create the database and user with the credentials as discussed in the above installation procedure.
- Install the requirements by navigating to the root directory of project
pip3 install -r requirements.txt - Now run the following commands after navigating into src/django_backend_api directory
python3 manage.py makemigrations python3 manage.py migrate - Run the tests
python3 manage.py test - Run the server
python3 manage.py runserver 0.0.0.0:8080 - Go to the url 127.0.0.1:8080/api
Project Directory Structure
.
├── e
├── get-pip.py
├── LICENSE
├── README.md
├── requirements.txt
├── src
│   └── django_backend_api
│       ├── api
│       │   ├── admin.py
│       │   ├── apps.py
│       │   ├── __init__.py
│       │   ├── migrations
│       │   │   ├── 0001_initial.py
│       │   │   ├── __init__.py
│       │   │   └── __pycache__
│       │   │       ├── 0001_initial.cpython-35.pyc
│       │   │       └── __init__.cpython-35.pyc
│       │   ├── models.py
│       │   ├── permission.py
│       │   ├── __pycache__
│       │   │   ├── __init__.cpython-35.pyc
│       │   │   └── views.cpython-35.pyc
│       │   ├── serializers.py
│       │   ├── sitemaps.py
│       │   ├── tests
│       │   │   ├── __init__.py
│       │   │   ├── public_user_api_test.py
│       │   │   ├── __pycache__
│       │   │   │   ├── __init__.cpython-35.pyc
│       │   │   ├── test_about_api.py
│       │   │   ├── test_certificate_api.py
│       │   │   ├── test_college_api.py
│       │   │   ├── test_portfolio_image_api.py
│       │   │   ├── test_project_api.py
│       │   │   ├── tests.py
│       │   │   └── test_user_profiles.py
│       │   ├── urls.py
│       │   ├── utils.py
│       │   └── views.py
│       ├── db.sqlite3
│       ├── django_backend_api
│       │   ├── __init__.py
│       │   ├── __pycache__
│       │   │   ├── __init__.cpython-35.pyc
│       │   │   └── wsgi.cpython-35.pyc
│       │   ├── settings.py
│       │   ├── urls.py
│       │   └── wsgi.py
│       ├── manage.py
│       └── media
│           └── uploads
│               ├── avatar
│               │   ├── 362af174-310f-4d00-9a30-26fe8d533fdb.jpg
│               │   ├── 825d95dc-efc4-40d7-8954-8e775864348c.PNG
│               │   └── a2c74d16-06dd-4090-aab9-c7f776d1d411.jpg
│               ├── Django-Architecture-Diagram.jpg
│               ├── project outline.png
│               └── schematic diagram and development.png
├── ubuntu-xenial-16.04-cloudimg-console.log
└── Vagrantfile
API examples
- Signup
- Method and Header
POST /api/signup/ Authorization: Basic Og== Content-Type: application/json Host: 127.0.0.1:8080 accept-encoding: gzip, deflate - Request Body
{ "email": "testemail@email.com", "name": "test", "password":"test123", } - Response Body: 200
  {
 "summary" : {
    "status" : "success",
    "statusCode" : 201
 },
 "data" : {
    "id" : 1,
    "email" : "testemail@email.com",
    "name" : "test"
 }
  }
- Method and Header
- Profile Login
- Method and Header
POST /api/login/ Content-Type: application/json token: Token 53cdb081137714c6d0578602f3a5f745a72622d9 Authorization: Basic dGVzdGVtYWlsNUBlbWFpbC5jb206dGVzdDEyMw== User-Agent: PostmanRuntime/7.6.0 Host: 127.0.0.1:8080 - Request Body
{ "username" : "testemail5@email.com", "password": "test123" } - Response Body
  {
 "token" : "<authentication_token>"
  }
- Method and Header
- Create/Update about section
- Methods and Headers
POST /api/about/ Authorization: Token <authentication_token> User-Agent: PostmanRuntime/7.6.0 Host: 127.0.0.1:8080 - Request Body
{ "highlights" : "some highlight about logged in user", "about" : "about logged in user" } - Response Body
 {
 "summary" : {
    "statusCode" : 201,
    "status" : "success"
  },
  "data" : {
    "id" : 3,
    "highlights" : "some highlight about logged in user",
    "about" : "about logged in user",
    "user_profile" : 1
  }
 }
- Methods and Headers
- User’s Public Portfolio Body
- Methods and Headers
HTTP 200 OK GET /api/user/aditya Accept: */* Host: 127.0.0.1:8080 Allow: GET, HEAD, OPTIONS Content-Type: application/json - Response Body
 {
   "summary": {
       "details_count": 1,
       "status": "success"
   },
   "data": [
       {
           "url": "http://127.0.0.1:8080/api/portfolio-update/1/",
           "name": "aditya",
           "created_on": "2020-04-26T18:34:11.898286Z",
           "email": "ad@fsn.cm",
           "skill": [
               {
                   "url": "http://127.0.0.1:8080/api/skills/1/",
                   "skill": "some skill",
                   "rate": 8,
                   "user_profile": "http://127.0.0.1:8080/api/signup/1/"
               }
           ],
           "work_experience": [
               {
                   "url": "http://127.0.0.1:8080/api/work-experience/1/",
                   "company": "some company",
                   "address": "some address",
                   "about": "about company",
                   "company_url": "http://some.company.url/",
                   "joining_date": "2020-04-28T18:13:11.879035Z",
                   "to_date": "2020-04-28T18:13:11.879056Z",
                   "currently_working": true,
                   "user_profile": "http://127.0.0.1:8080/api/signup/1/"
               }
           ],
           "about": [
               {
                   "url": "http://127.0.0.1:8080/api/about/1/",
                   "highlights": "some test highlight about user",
                   "about": "about the user",
                   "user_profile": "http://127.0.0.1:8080/api/signup/1/"
               }
           ],
           "achievement": [
               {
                   "url": "http://127.0.0.1:8080/api/achievements/1/",
                   "achievement": "some user achievement",
                   "when": "2020-04-28T18:13:42.168902Z",
                   "where": "2020-04-28T18:13:42.168940Z",
                   "user_profile": "http://127.0.0.1:8080/api/signup/1/"
               }
           ],
           "interest": [
               {
                   "url": "http://127.0.0.1:8080/api/interests/1/",
                   "interest": "some interest",
                   "user_profile": "http://127.0.0.1:8080/api/signup/1/"
               }
           ],
           "certification": [
               {
                   "url": "http://127.0.0.1:8080/api/certificates/1/",
                   "certificate": "some certification",
                   "about": "some about",
                   "certificate_url": "http://127.0.0.1:8080/api/certificates/",
                   "user_profile": "http://127.0.0.1:8080/api/signup/1/"
               }
           ],
           "project": [
               {
                   "url": "http://127.0.0.1:8080/api/projects/1/",
                   "project": "some project",
                   "about": "about project",
                   "feature": "project feature",
                   "tech_stack": "project tech",
                   "project_url": "http://127.0.0.1:8080/api/projects/",
                   "user_profile": "http://127.0.0.1:8080/api/signup/1/"
               }
           ],
           "education": [
               {
                   "url": "http://127.0.0.1:8080/api/education/1/",
                   "college_name": "some college",
                   "college_address": "some address",
                   "grade": "CGPA",
                   "degree": "some degree",
                   "from_date": "2020-04-28T18:12:03.165680Z",
                   "to_date": "2020-04-28T18:12:03.165792Z",
                   "user_profile": "http://127.0.0.1:8080/api/signup/1/"
               }
           ],
           "avatar": "http://127.0.0.1:8080/media/uploads/avatar/825d95dc-efc4-40d7-8954-8e775864348c.PNG"
       }
   ]
  }
- Methods and Headers
Features that one can work on -
- To add Search filter for API’s.
- To add Language translator for DRF’s messages.
- Add Social Authentication
Open to Contribute
Please create issue if something that needs to be worked on or someone having trouble using it. This project is open for everyone who wants to bring ideas or contribute.
Find the project useful? ❤️
Support it by clicking the ⭐ button on the upper right of this page. ✌️
License
MIT License
Copyright (c) 2020 Aditya Raj

Permission is hereby granted, free of charge, to any person obtaining a copy of this software, to deal in the
Software without restriction, including without limitation the rights to use, copy and/or sell copies of the
Software, and to permit persons to whom the Software is furnished to do so, subject to the following conditions:

The above copyright notice and this permission notice shall be included in all copies or substantial portions of
the Software.

THE SOFTWARE IS PROVIDED "AS IS", WITHOUT WARRANTY OF ANY KIND, EXPRESS OR IMPLIED, INCLUDING BUT NOT LIMITED TO
THE WARRANTIES OF MERCHANTABILITY, FITNESS FOR A PARTICULAR PURPOSE AND NONINFRINGEMENT. IN NO EVENT SHALL THE
AUTHORS OR COPYRIGHT HOLDERS BE LIABLE FOR ANY CLAIM, DAMAGES OR OTHER LIABILITY, WHETHER IN AN ACTION OF CONTRACT,
TORT OR OTHERWISE, ARISING FROM, OUT OF OR IN CONNECTION WITH THE SOFTWARE OR THE USE OR OTHER DEALINGS IN THE
SOFTWARE.